GUIDE 05

Regions, Bosses & Dungeons

From the Green Fields to the Ruined Castle — what shows up where, and what you get for clearing it.

Last updated: 8 August 2026

1. Region list

#RegionMonstersBoss
1Green FieldsSlime, Field Rat, ToadstoolField Cyclops
2Dark ForestSpider, Bat, ImpForest Gargoyle
3Barren DesertBeetle, Field Rat, ImpDesert Mimic
4Frozen PeaksBat, Ghost, SpiderSnowpeak Warlock
5Cursed GraveyardGhost, Bat, Field RatGraveyard Lich
6Ruined CastleRogue, Barbarian, ImpFallen Knight Commander
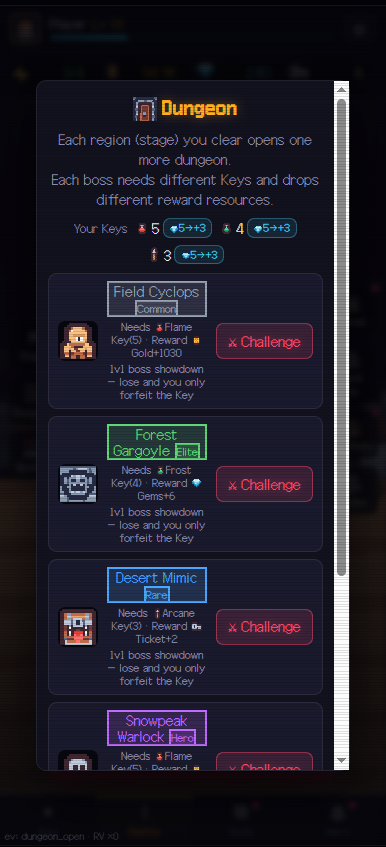
Scroll Dungeon dungeon list showing each boss with its required key and reward
The Dungeon list. Each entry shows its grade, the key it consumes, and exactly what it drops — handy for deciding where to spend keys.

Regions unlock in order, and every one shares the same 5 field → 3 dungeon → 1 boss nine-wave structure. Each boss kill raises that region's stage count; monsters gain roughly 12% per stage while rewards scale alongside.

Stage clear gold works out to 300 + (region number − 1) × 200 + (stage − 1) × 60. Cursed Graveyard at stage 3, for instance, pays 300 + 800 + 120 = 1,220 gold.

2. The bestiary is a permanent stat

Killing a monster registers it in your bestiary. This isn't just collection flavour — it grants permanent stats.

Since each region has a different monster pool, it's worth running at least one pass through every newly unlocked region to fill gaps. The Ruined Castle's Rogue and Barbarian in particular appear nowhere else.

3. The Mimic trap

Some treasure chests in the field are Mimics. The chest-opening animation plays normally, then reveals itself on the second beat and flips straight into combat.

How to handle it — Mimics have noticeably more health than regular monsters. Opening a chest at low HP is a common way to end a run. If you're below half health, clear a campfire or shrine before touching chests.

Worth noting: the Barren Desert's boss is the Desert Mimic. Chest encounters show up more often in that region, so stay especially alert there.

4. Event maps

The field stretch mixes in non-combat maps. They're the main lever on how long a run survives.

EventEffect
Shrine (HP blessing)Restores 40% of max HP — amplified by the Healing Boost card
Shrine (gold blessing)Bonus gold scaled to the region
Shrine (wisdom blessing)+20 XP
CampfireRestores HP
Village mealRestores HP
Treasure chestLoot — unless it's a Mimic

When HP gets dangerous the game prompts you with "Recover at a Camp map". That's the cue to stop pushing and hold out for a healing map. The Rare-tier Combat Regen card (3% HP per field clear) makes this stretch far more stable.

5. Dungeons and keys

Each region's boss doubles as a dungeon boss. Clearing a region's stage unlocks the matching dungeon. Dungeons consume a key and pit you against the boss alone, with no field run attached.

#DungeonKeyGradeReward
1Field CyclopsFlame KeyCommon400 gold + level×35
2Forest GargoyleFrost KeyElite6 gems
3Desert MimicArcane KeyRare2 tickets
4Snowpeak WarlockFlame KeyHero1,300 gold + level×35
5Graveyard LichFrost KeyLegendary12 gems
6Fallen Knight CommanderArcane KeyLegendary3 tickets

Keys can be bought at 5 gems for 3 keys, and clearing a dungeon also drops a bonus key.

Which dungeon to run

The key insight — among dungeons sharing a key type, the higher number is strictly better. Spend Flame Keys on #4 rather than #1, Frost on #5 rather than #2, Arcane on #6 rather than #3. The key cost is identical.